Basics of watercolor painting in Photoshop
Introduction
As the article 'The Watercolor Look & Feel' explains, there are a number of key characteristics to watercolor painting. This article describes the mechanisms used to simulate these using Photoshop.
Paper Texture and Color
Because watercolor paint is normally dilute and transparent, the paper texture and color shows through. This is achieved in Photoshop primarily by having a background layer that contains an image of watercolor paper. The PaintingDigitally toolset automatically creates this background layer when the MakeWatercolorPaper action is run. It is absolutely essential not to paint on this background layer, otherwise the paper texture will be painted over. For this reason, the MakeWatercolorPaper action locks and renames the background layer.
You can modify the paper texture by first unlocking the 'Background Locked' layer and then applying a Levels adjustment to increase or reduce the texture, or a Hue/Saturation adjustment to change the color of the paper. Alternatively, you can if you wish replace the background layer with your own paper texture. But please remember to lock the layer once you've made the changes to prevent accidental overpainting.
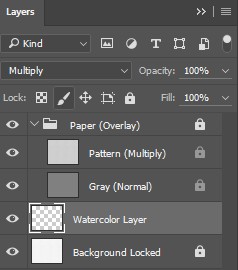
As the painting is built up using multiple layers, or if dark paint is used, the texture supplied by the background layer is reduced. Although this is normal in watercolor painting, the MakeWatercolorPaper action provides additional layers to control the extent to which the texture is retained. These layers are set in a group called 'Paper (Overlay)' as shown here.
By default the layer group is locked to prevent accidental overpainting, and the layer group opacity is set to 70%. If you want to reduce or increase the paper texture then unlock the layer group and adjust the layer group opacity. You can also apply a Levels adjustment to the 'Pattern (Multiply)' layer for further texture control.
If you have replaced the background layer with your own watercolor paper pattern then you should also replace the 'Pattern (Multiply)' layer with the same paper pattern.
Paint Transparency
This, of course, is one of the defining characteristics of watercolor paint. There are three main ways that this can be simulated in Photoshop:
Brush Opacity
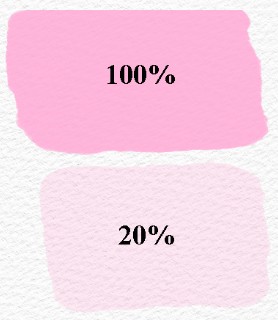
As shown at the left, if the Brush opacity is set to 100% then the paint is totally opaque (subject to the Layer Blend Mode, as explained below). If the brush is set to 0% then the paint is completely transparent (or invisible). Any setting in between (for example 20% as shown) will give more or less transparent paint. This is the exact equivalent to diluting paint with water in traditional painting.
Notice that the paint at 20% allows the paper texture to show through, whereas at 100% the paper texture is completely covered.
Layer Opacity
If the Brush opacity is set to 100% and the Layer opacity is set to 100% then the paint is totally opaque, as above. If the layer opacity is set to 0% then the paint is completely transparent (or invisible), irrespective of the brush opacity. Any setting in between will give more or less transparent paint. Like Brush opacity, this is equivalent to painting with a more or less dilute paint, but unlike Brush opacity which applies to each stroke of the brush, Layer opacity applies to the whole layer.
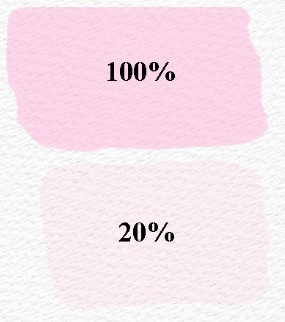
At the right I have set the layer opacity to 50%, and the effect is to reduce the 100% brush stroke to an effective opacity of 50% and the 20% brush stroke to an effective opacity of 10%. Notice that the 100% brush stroke is now allowing the underlying paper texture through (to some extent ... 50% to be precise).
In general the layer opacity of a paint layer is always set to 100%, but if you find that the whole layer is too dark then you may be able to fix the problem simply by reducing the layer opacity.
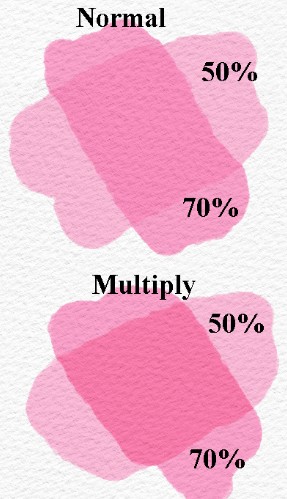
Layer Blend Mode
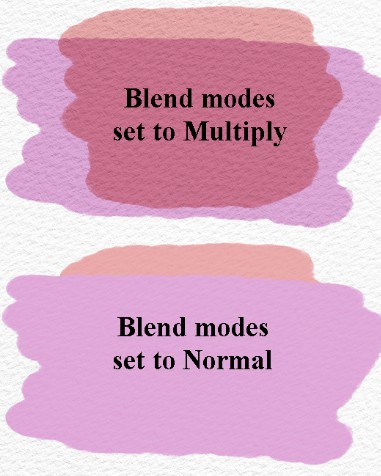
This is the most important setting for watercolor painting in Photoshop. The paint layer (which is created automatically when you run the Make Watercolor Paper action) must always be set to Multiply. The best way to understand the effect of the Multiply blend mode, is to think of a transparency slide projected onto a screen (imagine that the screen has a paper texture). Now put a second slide over the first: the image projected on the screen will now be a composite of both slides and the screen.
This is essentially how the Multiply blend mode works: each layer is superimposed on the ones below it. The net effect is to make the layers transparent as I show at top left, but with no loss of paint strength (as there would be if the layer opacity was reduced).
The Multiply layer blend mode can be used very simply to darken a layer (which is set to Multiply). Simply duplicate the layer and the effect will be a much darker and richer composite (in the same way that two identical slides stacked on top of each other will give a darker result than a single slide). To reduce the strength of the effect simply adjust the top layer opacity. For an even stronger effect, duplicate the layer again.
Brush Mode
The brush blend mode is usually at the default setting of Normal. In this mode each brush stroke covers the paint underneath it fully if the brush opacity is set to 100%, or partially if the brush opacity is set to a lower value. However if the brush blend mode is changed to Multiply then the effect is the same as using a Multiply blend mode on two layers, except that the effect is on every stroke.
As can be seen on the right, the result is a much darker and richer blend than with the brush mode set to Normal.
For an even stronger effect a brush mode of Color Burn may be used. And other modes such as Screen have the opposite effect, of Lightening the underlying paint strokes. Used with care these brush modes can be very useful.
Opaque Paint
If you want the paint to be opaque (to simulate gouache, acrylic, chalk etc.) then both the brush and the layer blend modes should be set to Normal. Usually the layer and brush opacities will be at 100% and lightening and darkening colors is achieved by adding white or black to the color (or by picking a lighter/darker color in the color picker). If you do not want any of the paper texture to show then you should move the paint layer above the Paper (Overlay) group.
If you wish to control the opacity of the paint, you can set the layer opacity to 100% and the brush opacity to pressure sensitive: then if you press the stylus down you will get an opaque stroke, if you press it more lightly you will get a semi-transparent stroke.
Paint Flow

The way that wet paint flows and mixes into wet or semi-dry paint is another defining characteristic of watercolors. But unlike paint transparency, it is not a feature that can be simulated directly using Photoshop. Each paint stroke is laid down as though the underlying paint is fully dry, so that the paint builds up, stroke, by stroke, as shown at the left.
Programs like Corel Painter attempt to automate the flowing and mixing of paint, but in my opinion they do so very badly, for the simple reason that paint flow and mixing is very complex. A slight change in the wetness of the applied paint, or of the underlying paint will completely change the mixing and flowing; different paints will mingle differently due to their particle sizes and chemical compositions. Furthermore, the type of paper (for example whether it is a hot press paper or a cold press paper, whether it is a mix of synthetic and wood or pure cotton pulp, how much sizing is in the paper), the angle of the paper to the horizontal and so on all have a major effect on how paint interacts with paint.
It can take years in traditional watercolor painting to fully understand and master the control of water ... in fact this may be the single most important thing to understand and get a feel for in watercolor painting. In Photoshop there is no need to do through this long learning period, but it is important to have a good sense of how paint flows and mixes on paper in order to be able to render a realistic simulation.
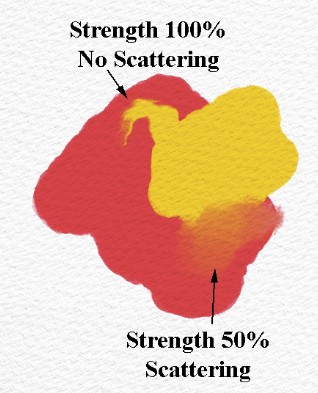
Smudge Tool
At any rate, paint flow is primarily simulated in Photoshop by the use of blenders ... or by the Smudge tool to be precise. The procedure is to lay down a stroke (or a number of strokes of paint) and then to blend them using the Smudge tool. The settings of the Smudge tool is critical as it can simulate either dragging or blending. Essentially, if the Smudge tool is set to a high Strength and with no Scattering, the tool will drag the paint. If the tool is set to a lower Strength and has scattering, it will mix the paint, as can be seen at the right.
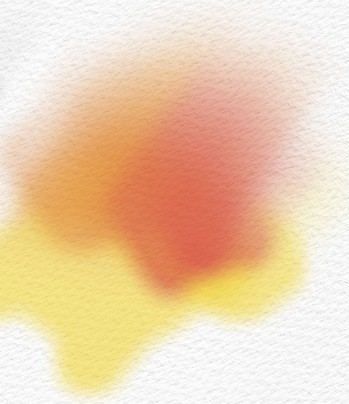
Blur Filters
Lovely paint mixing and flowing effects can be achieved using the blur filters, as shown on the left. In this case I applied a Lens Blur to the paint and then a Motion Blur to the top part of the object (the Motion blur filter is particularly useful for achieving a smooth gradient wash).
By using different filters and selections, a wide variety of effects are possible.
For precise control of the filter effects, the layer can be converted to a Smart Object (but remember to change the layer blend mode back to Multiply after converting the layer to a Smart Object).
Brushes
Just as in traditional painting, different effects can be achieved using different brushes. For example a round brush with a fine point is useful for detailed work, while a wide flat brush is very good for putting down broad strokes and washes.
Photoshop has an exceptionally powerful brush engine ... which is something that is not generally known, perhaps because most of us think of Photoshop as a photography rather than a painting program.
Brush Types and Controls
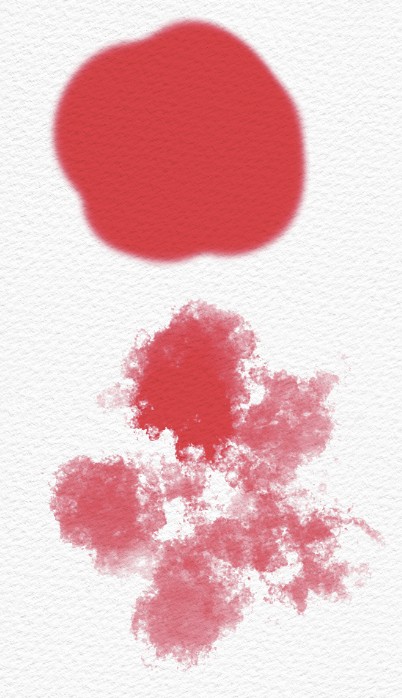
Not only does Photoshop offer a variety of brush types (stamp (CS4 and before), bristle (CS5 and after), erodible tip brushes (CS6 and after), airbrush (CS6 and after)), but all the brush types have many controls that enable a huge range of effects. As an example, the top and bottom blobs at the right were both made with a single stroke using the same brush type: a very basic round stamp brush. The top blob has no controls applied to it while the bottom one has (pressure sensitivity, scattering, texture, dual brush and spacing). As you can see, the effects are hugely different.
Explaining how to make and modify brushes is entirely outside the scope of this article. However it would be very useful for you to experiment with some of the settings of the brushes supplied with the PaintingDigitally toolset. For example, take a brush like the DOD Hake brush and turn off scattering, say ... if you like the effect then you can create a new tool preset with this setting (and call it, say, DOD Hake Stiff).
Erasers
It is quite possible to paint without using erasers, just as it is possible to do so in traditional watercolor painting. However, erasers do make it possible to achieve a whole lot of effects, from simple paint removal to salt, scratching etc. The PaintingDigitally toolset has a good set of erasers that should be sufficient for most uses (as well as actions for effects like salt and scratching).
However an almost limitless set of erasers is possible by selecting a brush and changing its blend mode to Clear. In the example at the left, I have first painted some strokes using the DOD Hake brush with the blend mode set to Normal, and I have then changed the brush blend mode to Clear and painted a few diagonal strokes over the paint.
Edges and Pooling
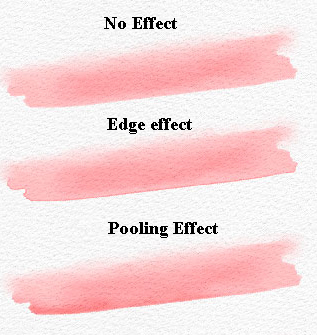
These are the last major watercolor effects and they can be achieved in Photoshop using the PaintingDigitally actions. These actions use two basic techniques: edge detection and layer styles.
The example at the right shows a paint stroke with no effect applied at the top. The Make Edges action was then applied to the stroke, showing an edge at the sides and bottom of the stroke. The Make Pooling action was also used on the original stroke to give the pooling effect: as you can see, the effect is to simulate paint flowing and pooling at the bottom of the stroke
Tablet and Pen
It's very important to tune your tablet settings, especially for pen pressure. If you are using a Wacom tablet, which I would recommend, then the Wacom Tablet Properties app will allow you to do this. Adjust the setting so that you can comfortably vary the pressure from almost completely off to fully on.
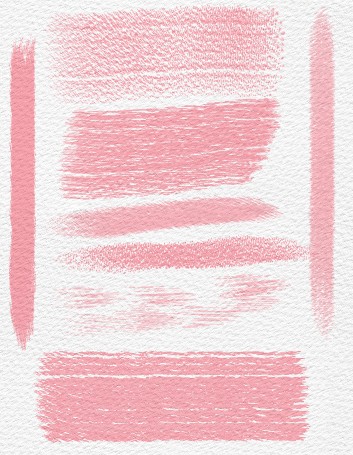
If you can afford it, I would also recommend the Wacom Art pen as it gives not only pressure and tilt control (as with the normal Wacom Grip pen), but it also gives rotation control. The example on the left shows the same brush (the DOD Hake brush) with the different strokes being varied simply by changing the pressure, tilt and rotation of the brush. As you can see, rotation is particularly useful for flat brushes like the DOD Hake brush (in fact it would be hard to use this brush properly without rotation).
And much much more ...
With Photoshop you can simulate pretty much any watercolor effect or technique. For example, masking in Photoshop is extremently powerful (and is essentially equivalent to the use of masking fluid, tape etc., in traditional painting), but with a great deal more power and flexibility. Patterns can easily be applied either as a stamp or as a mask. Paint granulation is easy to simulate with special brushes (the PaintingDigitally toolset provides these). Mixed media is also easy to simulate, especially gouache, dilute acrylic, pastels, crayon and charcoal.
Beyond that it is a question of imagination and knowledge of Photoshop. The filters and adjustment layers, for example, make it possible to achieve a huge range of effects. And of course Photoshop makes compositing a breeze.
But if you want to create very realistic watercolor paintings in Photoshop then it would be a really good idea to play around with brush and paper and splash some paint around. The best way to achieve a real watercolor look in Photoshop is to know what a real watercolor look is and how the look is achieved on paper.
And ... finally ... there is nothing more satisfying than printing your painting and framing it. The wonderful thing about digital watercolor painting is that inkjet printing uses pigment inks that are very similar to watercolor paints, so that your prints can be almost indistinguishable from a traditional painting. For more information on how to do this have a read of my article Printing Your Painting'
I hope you enjoyed the article!

